上海静安愚园东路28号3号楼一楼 新车间
 Sign up 报名参加
Please do sign up no later than 22nd Wednesday!
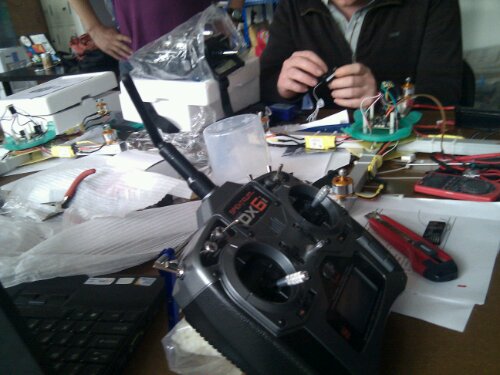
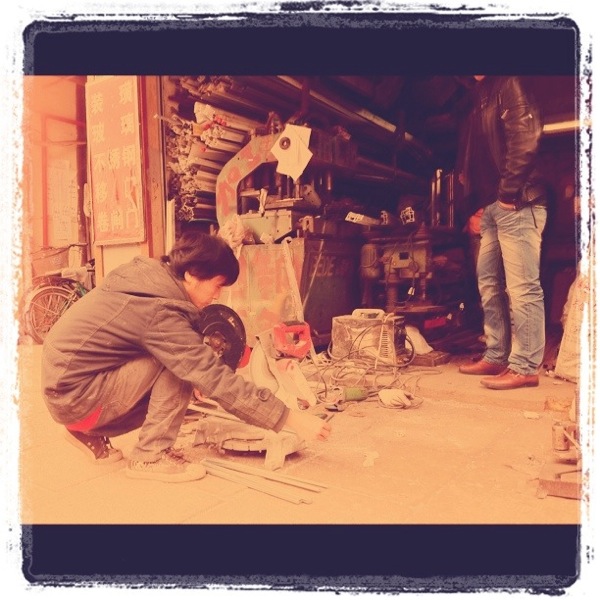
Build your own hobby-grade high speed drone! Kit consists of everything you need to get into the drone hobby ( including remote control). Capable of flying Kilometers away and can climb hundreds of meters into the sky. You may also install modules such as camera, sonar, Gps, great platform for your future projects. The drone is entirely made of extremely strong and light carbon fiber, it is almost impossible to break. Note: This is NOT a toy
Kit Fee:
1600 RMB
Workshop Fee:
300RMB
Time:
April 25th, from 10am till project finished
]]>
Sign up 报名参加
Please do sign up no later than 22nd Wednesday!
Build your own hobby-grade high speed drone! Kit consists of everything you need to get into the drone hobby ( including remote control). Capable of flying Kilometers away and can climb hundreds of meters into the sky. You may also install modules such as camera, sonar, Gps, great platform for your future projects. The drone is entirely made of extremely strong and light carbon fiber, it is almost impossible to break. Note: This is NOT a toy
Kit Fee:
1600 RMB
Workshop Fee:
300RMB
Time:
April 25th, from 10am till project finished
]]>
Racing drone workshop | 飞行器制作工作坊 – April 25
April 9th, 2015 § 16 comments § permalink
Quadcopter assembly workshop
October 29th, 2011 § 4 comments § permalink
Building an army of inexpensive quadcopters…
]]>四轴飞行器上天了
September 14th, 2011 § 0 comments § permalink
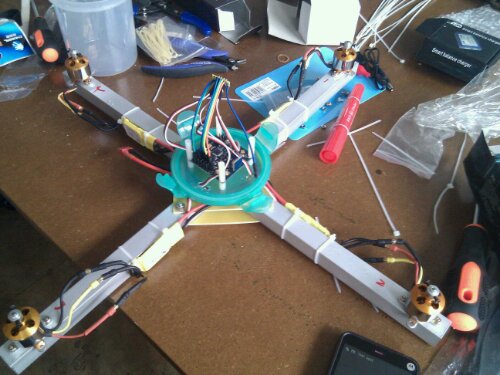
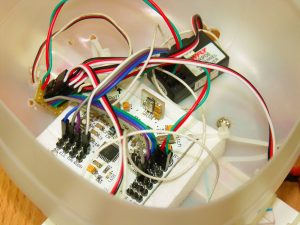
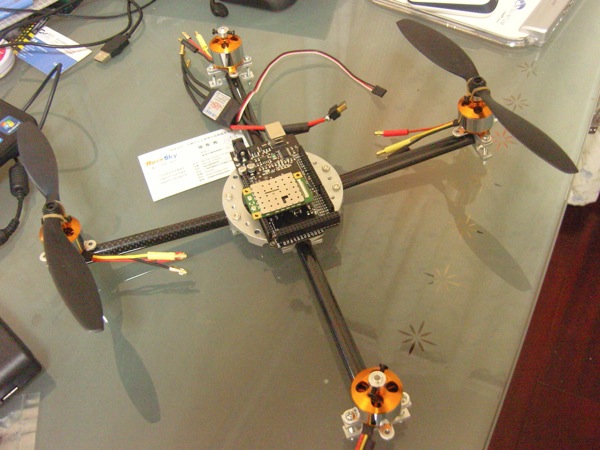
细细想来,为了仍这个东西上天已经折腾了一年的时间了,试了无数的方案,也受到了无数人的帮助。终于是上天了,下面就是整机的照片。样子有点丑,各位hold住。
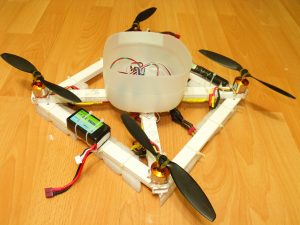
这个飞行器是以上天为目标,所以机架什么都是最低成本制作。用两块钱买来的PVC管子加上一个捡来的饮用水桶就成了四轴的机架。
用了两块电池,kk飞控,四个新西达1000kv电机,四个新西达30A电调。下面是控制部分的特写。
下面是第一次飞行视频。
]]>Reading g-sensor with Arduino
May 6th, 2011 § 1 comment § permalink
Arduino读取g-sensor数据 May 2nd, 2011
在四轴飞行器上除了要有陀螺仪外,还要有个重要的传感器就是重力传感器。由于它们各自的误差,若使用单一的传感器会造成严重的精读问题,使飞行器丧失稳定性。所以要用两个传感器进行相互矫正。
现在重力传感器应用非常广,目前iphone等智能手机上都有重力传感器,包括笔者的一台山寨手机上都有重力传感器。
这次就是要用Android来读取重力传感器的数据。这个重力传感器模块是从淘宝购买的,模块非常简单,自己够买芯片来焊接也不成问题。根据它的datasheet,就能够知道如何使用这款重力加速度模块了。下面就进行详细的介绍
这个模块使用的芯片型号是MMA7260Q,(datasheet下载[PDF,229KB]),测试中的电路就是下面图片中的样子

控制的目标是通过重力传感器的数据来控制舵机的转动。但是发现会有少量的抖动,于是在程序中加入了一个简单的滤波器,阶数没有仔细调,但是基本上能够进行控制了。
http://v.youku.com/v_show/id_XMjYzNjIyODIw.html
下面是芯片的特写


下面是用到的代码
#include <Servo.h>
//Author:  HE Qichen
//Email:  heqichen(a)gaishi.vicp.net
//Website:  http://gaishi.vicp.net
//Date:  2011-5-2
#define FILTER_LEVEL  3
class Filter
{
  private:
    int buffer[FILTER_LEVEL];
  public:
    Filter()
    {
      int i;
      for (i=0; i<FILTER_LEVEL; ++i)
      {
        buffer[i] = 0;
      }
    }
    int filter(int value)
    {
      int i;
      int sum;
      for (i=0; i<FILTER_LEVEL-1; ++i)
      {
        buffer[i] = buffer[i+1];
      }
      buffer[FILTER_LEVEL-1] = value;
      sum = 0;
      for (i=0; i<FILTER_LEVEL; ++i)
      {
        sum += buffer[i];
      }
      return sum / FILTER_LEVEL;
    }
};
Servo testServo;
Filter xFilter, yFilter, zFilter;
void setup()
{
  Serial.begin(9600);
  testServo.attach(2);
}
void loop()
{
  int gx, gy, gz;
  gx = analogRead(A0);
  gy = analogRead(A1);
  gz = analogRead(A2);
  Serial.print("x: ");
  Serial.print(gx, DEC);
  Serial.print("  y: ");
  Serial.print(gy, DEC);
  Serial.print("  z: ");
  Serial.println(gz, DEC);
  int fgx, fgy, fgz;
  fgx = xFilter.filter(gx);
  fgy = yFilter.filter(gy);
  fgz = zFilter.filter(gz);
  Serial.print("  fx: ");
  Serial.print(fgx, DEC);
  Serial.print("  fy: ");
  Serial.print(fgy, DEC);
  Serial.print("  fz: ");
  Serial.println(fgz, DEC);
  testServo.write((fgz-100)/3);
  //delay(10);
}
]]>
Hacking Embedream Car
May 6th, 2011 § 0 comments § permalink
嵌入之梦-圆梦小车开发 May 1st, 2011
今天看到一台嵌入之梦的小车,但是上电之后发了疯似的乱跑,所以刷之。但新车间却没有网络,没办法,自己一点一点试。。结果如下
CT1	接受pwm,控制速度
CT2	前进控制信号,高电位转动
CT3	后退控制信号,高电位转动
但是由于小车上的UNO与我的Ubuntu连接有问题,貌似只有Windows是好的,Mac OS有时也会出问题。所以最后车上改用了Mega 1280。
但是又发现一个问题,就是Arduino使用USB供电的时候很正常,然而,使用车上接出来的5V电源时,程序就会混乱,完全没有一点规律。猜测可能是由于电机转动导致整个系统的电压下降,无法提供足够的电压给Arduino的板子上。这大概也是之前uno不会发疯的原因。没办法,在小车上再接一块9V层叠式电池,作为Arduino的电源。最后终于行了。
后面程序的作用是往前走,遇到前方有物体是后退,打弯,然后继续往前,一个简单的壁障程序。没有用到速度控制。下面就是这个小车最后的样子,手机拍的,将就看吧

左侧照

右侧照

再来一张
 http://v.youku.com/v_show/id_XMjYzMzY0NzA0.html
用到的程序就是下面的
//Author:	HE Qichen
//Email:	heqichen(a)gaishi.vicp.net
//Website:	http://gaishi.vicp.net
//Date:	2011-5-1
int status;
#define LEFT_SPEED   6
#define LEFT_FORWARD  7
#define LEFT_BACKWARD  8
#define RIGHT_SPEED  10
#define RIGHT_FORWARD  11
#define RIGHT_BACKWARD  12
#define ULTRASONIC_ECHO  3
#define ULTRASONIC_TRIG  4
#define NORMAL_SPEED  100
#define STOP_SPEED  0
void setup()
{
  Serial.begin(9600);
  setupMove();
  setupUltrasonic();
}
void loop()
{
  unsigned int d;
  moveForward();
  d = readDistance();
  Serial.println(d, DEC);
  if (d < 700)
  {
    moveBackward();
    delay(500);
    turnLeft();
    delay(200);
  }
}
void moveForward()
{
  analogWrite(LEFT_SPEED, NORMAL_SPEED);
  digitalWrite(LEFT_BACKWARD, LOW);
  digitalWrite(LEFT_FORWARD, HIGH);
  analogWrite(RIGHT_SPEED, NORMAL_SPEED);
  digitalWrite(RIGHT_BACKWARD, LOW);
  digitalWrite(RIGHT_FORWARD, HIGH);
}
void moveBackward()
{
  analogWrite(LEFT_SPEED, NORMAL_SPEED);
  digitalWrite(LEFT_BACKWARD, HIGH);
  digitalWrite(LEFT_FORWARD, LOW);
  analogWrite(RIGHT_SPEED, NORMAL_SPEED);
  digitalWrite(RIGHT_BACKWARD, HIGH);
  digitalWrite(RIGHT_FORWARD, LOW);
}
void turnLeft()
{
  analogWrite(LEFT_SPEED, NORMAL_SPEED);
  digitalWrite(LEFT_BACKWARD, HIGH);
  digitalWrite(LEFT_FORWARD, LOW);
  analogWrite(RIGHT_SPEED, NORMAL_SPEED);
  digitalWrite(RIGHT_BACKWARD, LOW);
  digitalWrite(RIGHT_FORWARD, HIGH);
}
void turnRight()
{
  analogWrite(LEFT_SPEED, NORMAL_SPEED);
  digitalWrite(LEFT_BACKWARD, LOW);
  digitalWrite(LEFT_FORWARD, HIGH);
  analogWrite(RIGHT_SPEED, NORMAL_SPEED);
  digitalWrite(RIGHT_BACKWARD, HIGH);
  digitalWrite(RIGHT_FORWARD, LOW);
}
void moveStop()
{
  analogWrite(LEFT_SPEED, STOP_SPEED);
  digitalWrite(LEFT_BACKWARD, LOW);
  digitalWrite(LEFT_FORWARD, LOW);
  analogWrite(RIGHT_SPEED, STOP_SPEED);
  digitalWrite(RIGHT_BACKWARD, LOW);
  digitalWrite(RIGHT_FORWARD, LOW);
}
void setupMove()
{
  pinMode(LEFT_SPEED, OUTPUT);
  pinMode(LEFT_FORWARD, OUTPUT);
  pinMode(LEFT_BACKWARD, OUTPUT);
  pinMode(RIGHT_SPEED, OUTPUT);
  pinMode(RIGHT_FORWARD, OUTPUT);
  pinMode(RIGHT_BACKWARD, OUTPUT);
  analogWrite(LEFT_SPEED, STOP_SPEED);
  digitalWrite(LEFT_FORWARD, LOW);
  digitalWrite(LEFT_BACKWARD, LOW);
  analogWrite(RIGHT_SPEED, STOP_SPEED);
  digitalWrite(RIGHT_FORWARD, LOW);
  digitalWrite(RIGHT_BACKWARD, LOW);
}
unsigned int readDistance()
{
  int duration;
  digitalWrite(ULTRASONIC_TRIG, LOW);
  delayMicroseconds(2);
  digitalWrite(ULTRASONIC_TRIG, HIGH);
  delayMicroseconds(5);
  digitalWrite(ULTRASONIC_TRIG, LOW);
  // The same pin is used to read the signal from the PING))): a HIGH
  // pulse whose duration is the time (in microseconds) from the sending
  // of the ping to the reception of its echo off of an object.
  duration = pulseIn(ULTRASONIC_ECHO, HIGH);
  return duration;
}
void  setupUltrasonic()
{
  pinMode(ULTRASONIC_TRIG, OUTPUT);
  pinMode(ULTRASONIC_ECHO, INPUT);
  digitalWrite(ULTRASONIC_TRIG, LOW);
}
]]>
Use Gyro with Arduino
May 6th, 2011 § 0 comments § permalink
在Arduino上使用陀螺仪控制舵机 May 1st, 2011
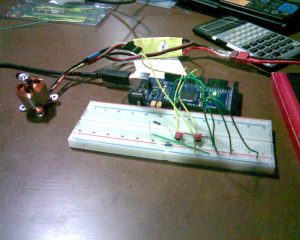
今天拿到了四轴飞行器的一个重要部件,就是陀螺仪。^_^ 下面这张图上的就是了,这是一个三轴陀螺仪,seeedstudio GROVE套装的一个部件。

这个陀螺仪使用ITG3200芯片,可以直接使用了I2C接口连接到Arduino上面。默认的地址是0x68,但是可以修改成0x69,只要将板子上的JP1连起来就可以修改。接口四个针脚的定义就像下面这张图中所画的。

是的。。你没看错,他们用红色作为地线 -_-b
舵机就是最简单的使用pwm的口就可以了。最后链接成下面这张图中的样子。

我写了一个程序,代码在下方,能够做到让陀螺仪的转动直接反应在舵机的摇臂上面。但是,这样也会遇到问题,就是当动的次数比较多的时候,舵机的角度就会越来越大,直到超过最大的范围,所以这也是陀螺仪不是很精确的地方。另外就是,在陀螺仪静止的情况下,z轴的输出不为0,始终为-1。也就是说,这个陀螺仪的零点可能是不准确的,同时,正负转动的也有可能有差别,不知道这回对将来飞控算法带来多大的影响。
最后用到的程序就是下面这段。
#include <Wire.h>
#include <Servo.h>
#define GYRO_ADDR  0x68
Servo servo;
int currentPos;
void setup()
{
  Wire.begin();
  initGyro();
  servo.attach(2);
  currentPos = 90;
  //Serial.begin(9600);
  pinMode(3, INPUT);
}
void loop()
{
  int x;
  int v;
  x = readx();
  v = ready();
  v = readz();
  currentPos = currentPos + x;
  int buttonState;
  buttonState = digitalRead(3);
  if (buttonState == HIGH)
  {
    currentPos = 90;
  }
  else
  {
    //Serial.println("LOW");
  }
  servo.write(currentPos);
}
int readx()
{
  int x;
  x = readGyro(0x1d, 0x1e);
  return x;
}
int ready()
{
  int y;
  y = readGyro(0x1f, 0x20);
  return y;
}
int readz()
{
  int z;
  z = readGyro(0x21, 0x22);
  return z;
}
char readGyro(unsigned char addrH, unsigned char addrL)
{
  char ret;
  Wire.beginTransmission(GYRO_ADDR);
  Wire.send(addrH);
  Wire.endTransmission();
  Wire.requestFrom(GYRO_ADDR, 1);
  if (Wire.available() > 0)
  {
    ret = Wire.receive();
  }
  Wire.beginTransmission(GYRO_ADDR);
  Wire.send(addrL);
  Wire.endTransmission();
  Wire.requestFrom(GYRO_ADDR, 1);
  if (Wire.available() > 0)
  {
    ret != Wire.receive()<<8;
  }
  return ret;
}
void initGyro()
{
  Wire.beginTransmission(GYRO_ADDR);
  Wire.send(0x3E);
  Wire.send(0x80);  //send a reset to the device
  Wire.endTransmission(); //end transmission
  Wire.beginTransmission(GYRO_ADDR);
  Wire.send(0x15);
  Wire.send(0x00);   //sample rate divider
  Wire.endTransmission(); //end transmission
  Wire.beginTransmission(GYRO_ADDR);
  Wire.send(0x16);
  Wire.send(0x18); // ±2000 degrees/s (default value)
  Wire.endTransmission(); //end transmission
}
程序当中Wire库就是使用I2C,具体文档可以看下面的链接。
http://arduino.cc/en/Reference/Wire http://v.youku.com/v_show/id_XMjYzMTg2ODQ0.html]]>Autonomous RC Car
May 6th, 2011 § 0 comments § permalink
自主机器人项目
我想通过改造一辆遥控小车,造出个自主移动机器人,遥控车就是下面这张图片中的车。

并且希望通过大家的智慧,把这个机器人做好,比如说,想在上面放一个无线摄像头;比如说,在上面放一个机械手臂;比如说,在这上面装一个超声测距模块……我将集中大家的智慧,集合到这个小车上面,^_^
http://v.youku.com/v_show/id_XMjYyMzQ4OTYw.html如果你有想法,请告诉我 hacker(a)gaishi.vicp.net
]]>Quadcopter Team
March 27th, 2011 § 0 comments § permalink
Quadcopter Team
We have come a long way since the day trying to build the frame out of window frame. Thanks to Danny and Qicheng’s effort!!! Damn, the aluminum and carbon fiber looks awesome!!! Hopefully, we can fly this in the next few months.


Building Quadcopter
March 22nd, 2011 § 1 comment § permalink
Building Quadcopter
Quadcopters are interesting to a lot of people and we have set up a quadcopter team looking into how to build a quadcopter from components we can find around Shanghai and finding instruction from the net. Researching quadcopter are a lot of fun and we have made some progress in the past few months.
Getting the frame
The first try to get the frame was fun. We Basically went down to the neighbor aluminum window frame maker and bought a few 50 cm aluminum frame and try to shanzhai our way to the frame. It doesn’t quite work but it’s a fun learning experience.
Getting the motors to work with Arduino
Getting the motors and propellers are easy. We can always count on Taobao for that. It took a while to get Arduino working with the motors tho.
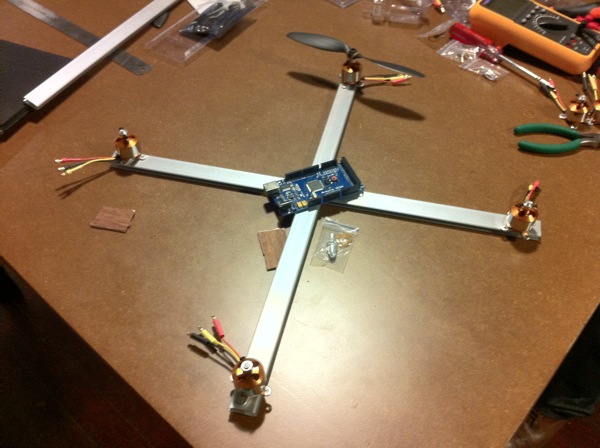
Prettier frames
Danny got a friend to design an aluminum and carbon fiber frame and have the structure CNCed. This is beautiful! We have come a long way and hopefuly we will get to fly this in the coming month.
Quadcopter Frame ready!
March 15th, 2011 § 2 comments § permalink
We have the FRAME!!!
Danny show up in Barcamp with a big surprise! He show me the fiber/aluminium frame of the quadcopter he just got CNCed. What a beauty!
