 报名参加 Register
Android手机 图形化编程应用软件 入门公开课
软件介绍
App Inventor 原是Google实验室(Google Lab)的一个子计划,由一群Google工程师勇于挑战的Google使用者共同参与。Google App Inventor是一个完全在线开发的Android编程环境,抛弃复杂的程式代码而使用积木式的堆叠法来完成您的Android程式。除此之外它也正式支持乐高NXT机器人,对于Android初学者或是机器人开发者来说是一大福音。因为对于想要用手机控制机器人的使用者而言,他们不大需要太华丽的界面,只要使用基本元件例如按钮、文字输入输出即可。
App Inventor於2012年1月1日移交给麻省理工学院行动学习中心,并已於3月4日公布使用。
开发一个App Inventor 程式就从您的浏览器开始,您首先要设计程序的外观。接着是设定程序的行为,这部分就像玩乐高积木一样简单有趣。最后只要将手机与电脑联接,刚出炉的程序就会出现在您的手机上了。
内容
1. 软件安装
2. Java语音介绍
3. App Inventor 入门
4. HelloWorld演示
5. 程序的通用模式
6. 与其他android开发软件的比较]]>
报名参加 Register
Android手机 图形化编程应用软件 入门公开课
软件介绍
App Inventor 原是Google实验室(Google Lab)的一个子计划,由一群Google工程师勇于挑战的Google使用者共同参与。Google App Inventor是一个完全在线开发的Android编程环境,抛弃复杂的程式代码而使用积木式的堆叠法来完成您的Android程式。除此之外它也正式支持乐高NXT机器人,对于Android初学者或是机器人开发者来说是一大福音。因为对于想要用手机控制机器人的使用者而言,他们不大需要太华丽的界面,只要使用基本元件例如按钮、文字输入输出即可。
App Inventor於2012年1月1日移交给麻省理工学院行动学习中心,并已於3月4日公布使用。
开发一个App Inventor 程式就从您的浏览器开始,您首先要设计程序的外观。接着是设定程序的行为,这部分就像玩乐高积木一样简单有趣。最后只要将手机与电脑联接,刚出炉的程序就会出现在您的手机上了。
内容
1. 软件安装
2. Java语音介绍
3. App Inventor 入门
4. HelloWorld演示
5. 程序的通用模式
6. 与其他android开发软件的比较]]>
Android手机图形化编程入门 Android App Programming for Beginners
August 8th, 2014 § 1 comment § permalink
Project City
February 2nd, 2013 § 3 comments § permalink
Metropolis“.
More about the project will be in the wiki soon as we just begun. Today we built the table where the city will be installed.
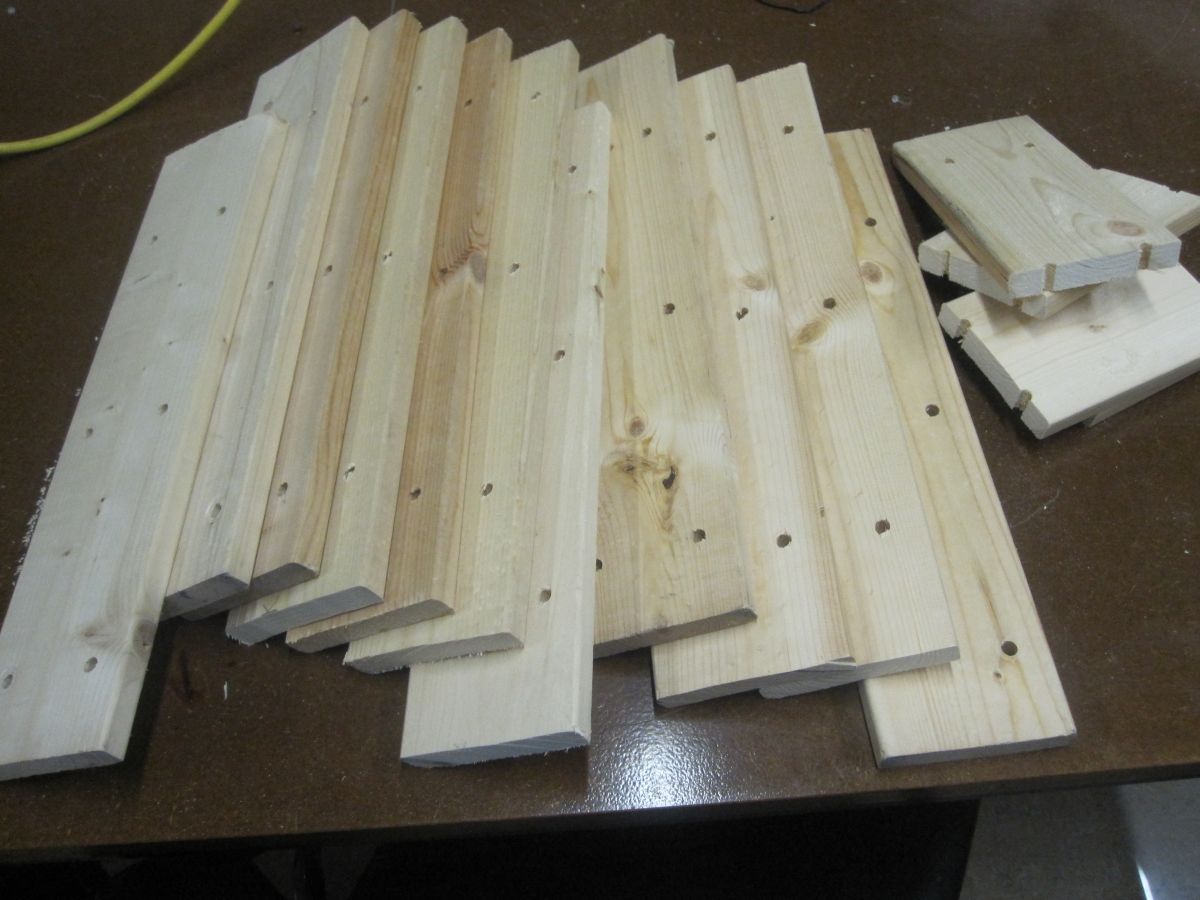
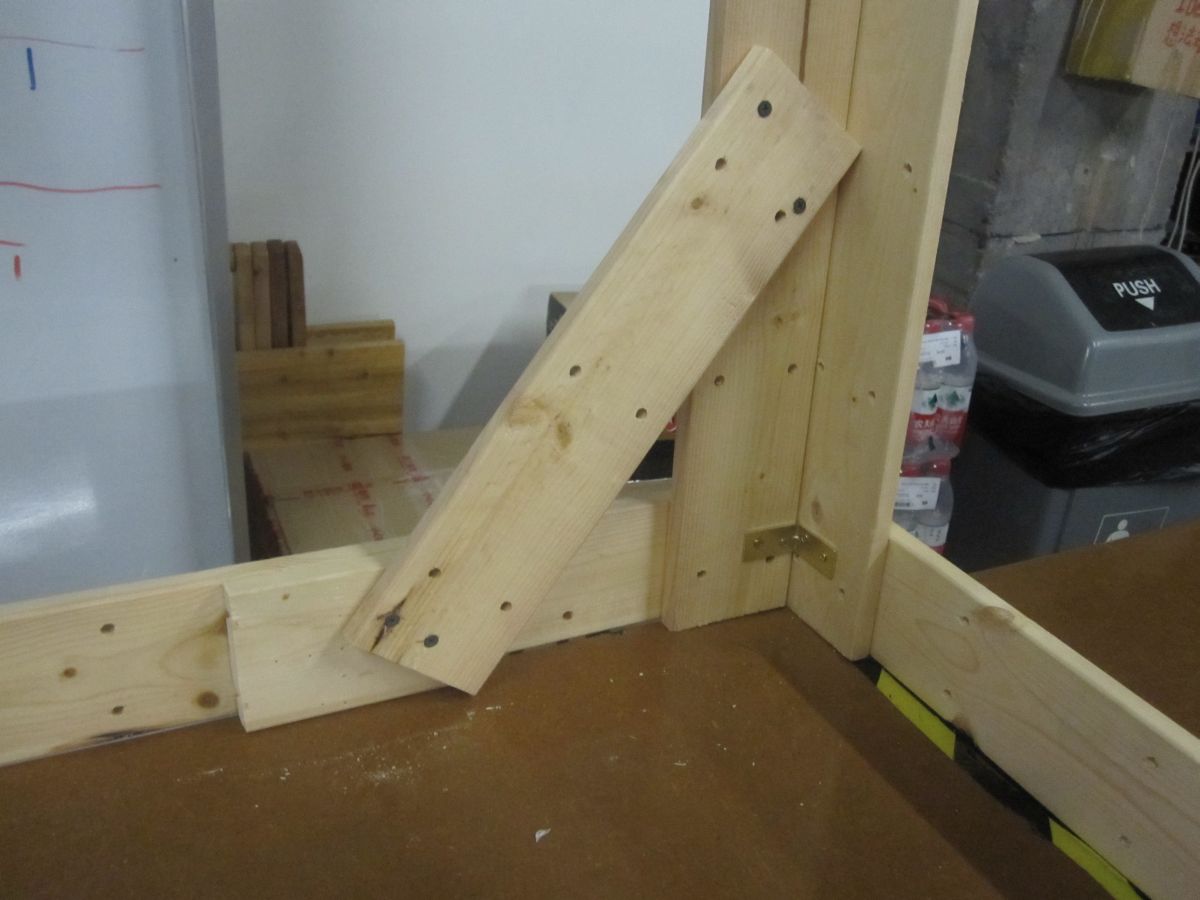
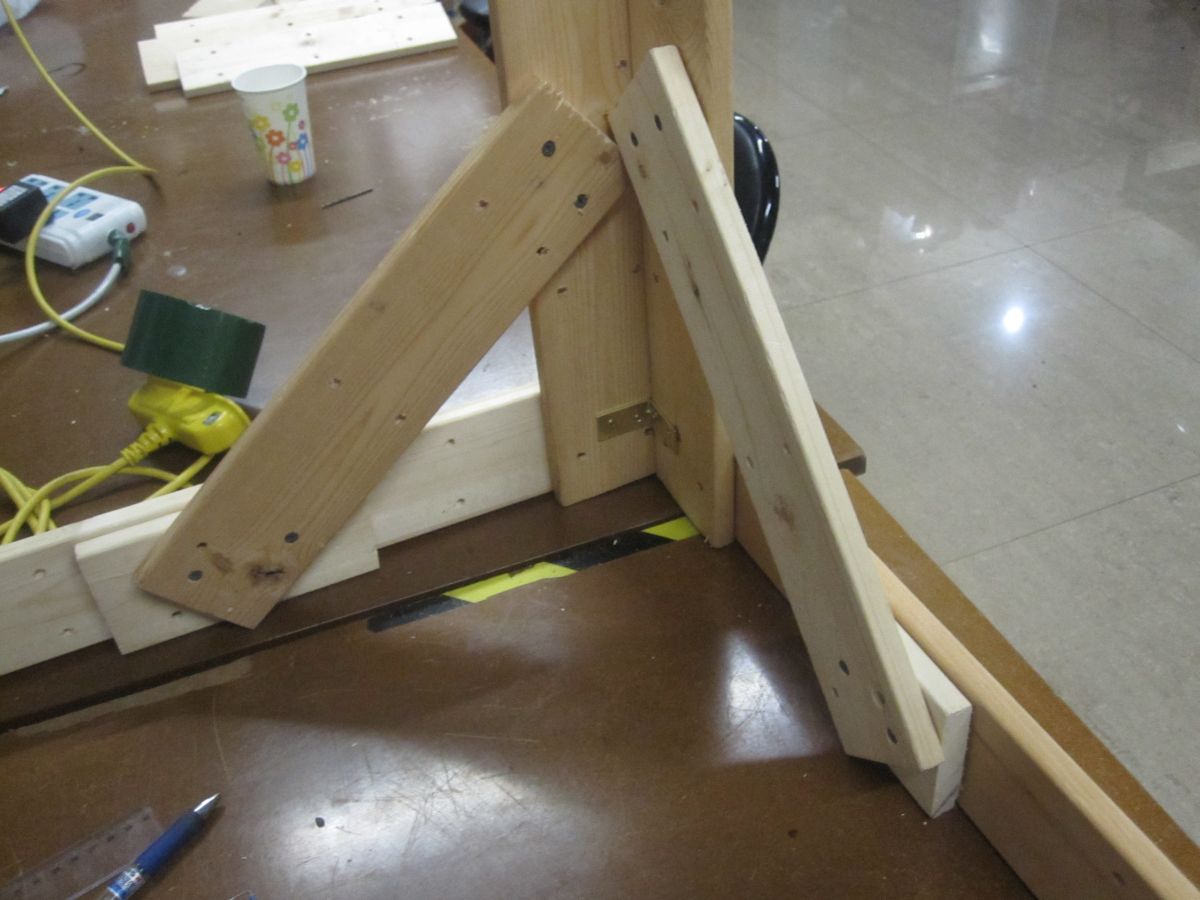

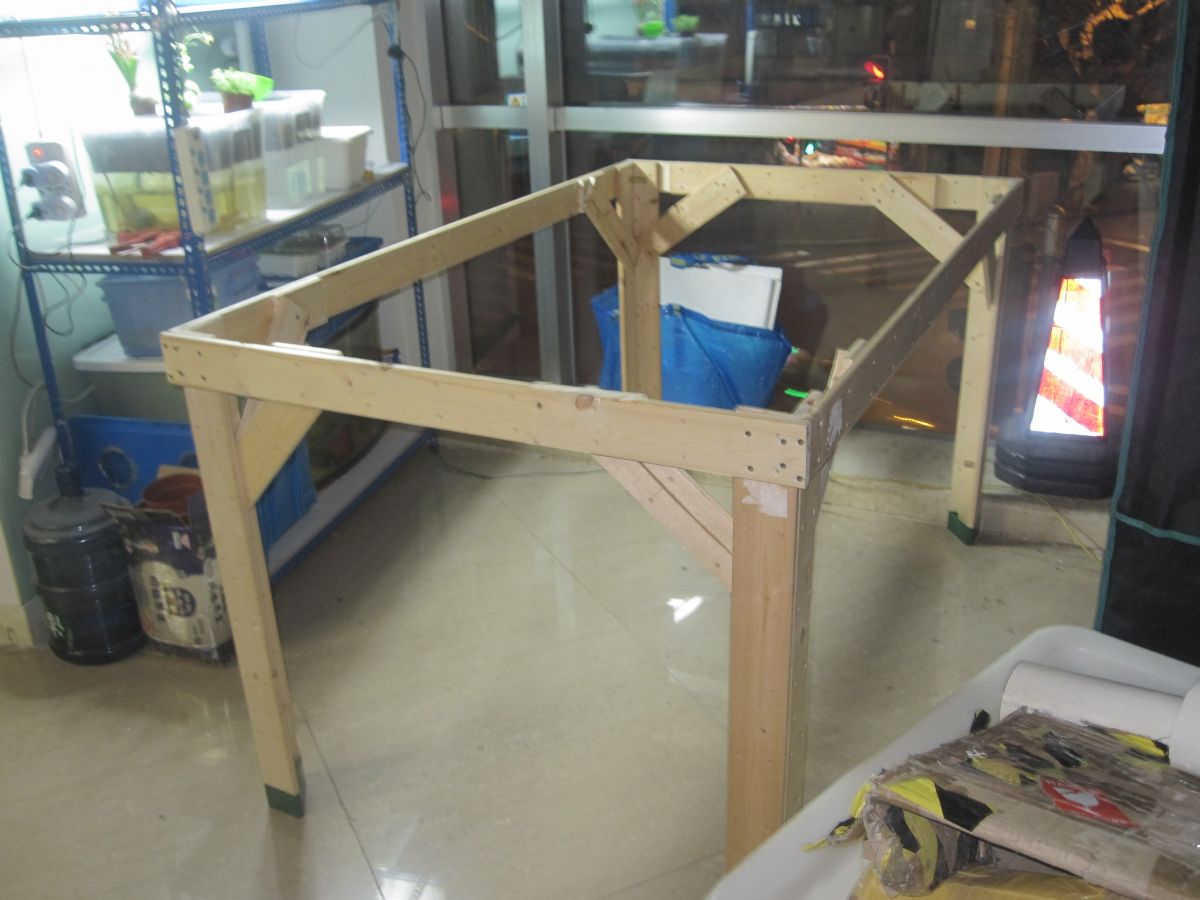 The project will be a fusion of 3D projection and robot hardware combined with mechanics and interactive components.
This project is open for all members with interest. There will be a huge part in 3D mapping/projection and this content has to be created too. The robotics and mechanical part will include Arduino based hardware for the movements, communication between the central computer and the city and interface for interactive components.
If you think you could help with something then just let us know.
]]>
The project will be a fusion of 3D projection and robot hardware combined with mechanics and interactive components.
This project is open for all members with interest. There will be a huge part in 3D mapping/projection and this content has to be created too. The robotics and mechanical part will include Arduino based hardware for the movements, communication between the central computer and the city and interface for interactive components.
If you think you could help with something then just let us know.
]]>
Pandaboard donation!
October 29th, 2011 § 0 comments § permalink
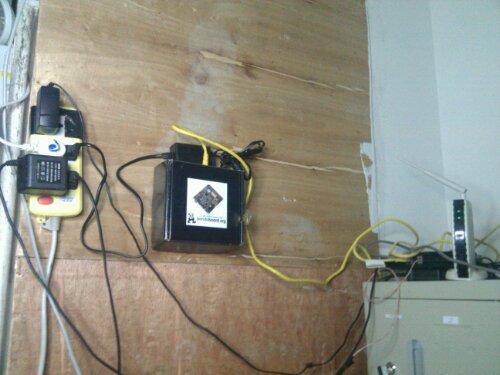

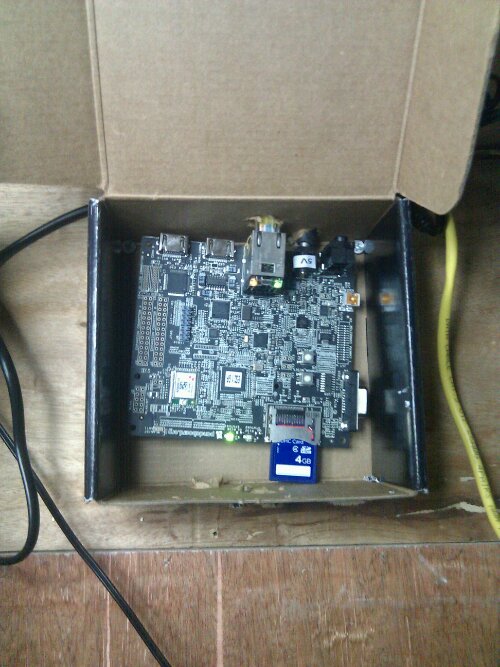 For more information, check our wiki.]]>
Got new toys thanks to DFRobot
September 29th, 2011 § 0 comments § permalink
We’ve got:Mega ADK, USB Host Shield, Midi Shield, X-Board, FTDI Basic,detail informations can be found on www.DFRobot.com.]]>
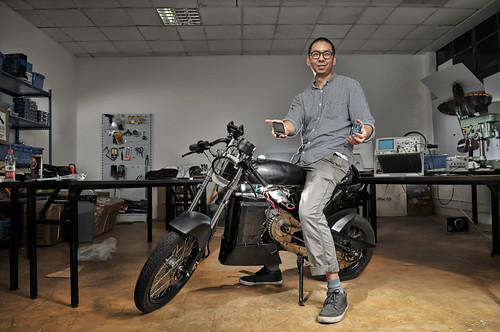
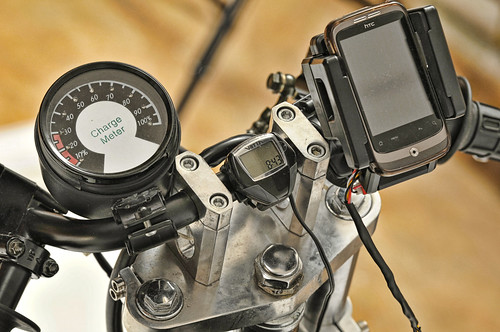
Rudy Bike @ XinCheJian
June 18th, 2011 § 5 comments § permalink
We are really happy to have the opportunities in hosting the Rudy Bike in the past few weeks so they can finish the bike for the Demo Day. Rudy Bike is a cool looking electric bike controlled by Arduino and Android.


Android & Robots
June 8th, 2011 § 1 comment § permalink
Android Open Accessory Development Kit.
The Android 3.1 platform (also backported to Android 2.3.4) introduces Android Open Accessory support, which allows external USB hardware (an Android USB accessory) to interact with an Android-powered device in a special “accessory” mode. When an Android-powered powered device is in accessory mode, the connected accessory acts as the USB host (powers the bus and enumerates devices) and the Android-powered device acts as the USB device. Android USB accessories are specifically designed to attach to Android-powered devices and adhere to a simple protocol (Android accessory protocol) that allows them to detect Android-powered devices that support accessory mode.Workshops are weekly and will explore both the development on the Android-side and the micro-controllers side – touching on all aspects of mechanical, electrical and software engineering of a robot. In particular, we will look together at the use of ADK-compatible hardware boards, such as the Google IOIO board or new hardware offerings from Seeedstudio. Participation for XinCheJian members who’ve paid their dues is free. For the non-members, the fee is 50 RMB per workshop. For more information, look at the “Android & Robots” wiki. Don’t forget to fulfill the necessary pre-requisites and join the [email protected] mailing list! Note that this is a collaborative workshop, so we expect everyone to contribute and participate actively.


[GGHC] XinCheJian coming out of the depths of video streaming from Android!
April 30th, 2011 § 0 comments § permalink
Ricky just make an update on his quest to streaming video from Android.

element14: XinCheJian GGHC: XinCheJian coming out of the depths of video streaming from Android!: “”
]]>Hacking HaiPad
April 10th, 2011 § 0 comments § permalink
posted a detail article on hacking HaiPad m701!
The M701 in itself is an example of hacking in China: here, hacking hardware that wasn’t thought to be workable together to achieve something close to a device that is much more expensive is not called a hobby but a full-time job! Like many others, the extremely low-cost of this 7 inch tablet is made out of a even lower cost chipset, the Telechips 8902. The Telechips was originally designed to fit high end automotive applications, not do tablets or robotics. This chipset powers a variety of similar devices: Augen Gentouch, Coby Kyros, HSG X5A, Haipad M701, Dawa D7, SmartQ v5/v7, Coby Kyros MID7005/MID7015, Imito iM7, Smartbook Surfer (Pictures) “Shanzhai” integrators prefer to keep their supply chain discreetly low-profile as they consider it their “secret” sauce. This is because in Shenzhen, manufacturers are in a race to produce a whole bunch and sell them before the local competitors do the same, often advertising capabilities of the underlying chipset that are actually unavailable to the user since unsupported by the OS.
 ]]>
]]>
Google releases Android robot libraries – DIY Drones
December 20th, 2010 § 0 comments § permalink
Wow, this is pretty big news for us at Xinchejian. Google releases Android robot libraries. In China, we have access to the biggest variety of Android devices, all thanks to the Shanzhai industry.
(Via DIYDrone.)
]]>Autonomous Robot Toy Car Project
December 19th, 2010 § 2 comments § permalink
I bought an RC car from Taobao at the extremely cheap price of 67RMB (shipping included! 10$USD!)!
For that price, you get an RC remote, a rechargeable Ni-Cd 400mAh/6V battery pack, the radio transmitter (27.145Mhz). Wheels have rubber, autonomy and range is decent although the chassis is very very cheap plastic obviously.
The downsides: on wood floor, it tends to spin so any autonomous program would need to constantly adjust based on sensor (distance ranging) input. It also has propulsion motors on a simple shock so the base isn’t totally flat with the ground.
The transmitter needed two AA batteries (not included!) so on Friday I ran out late at night to buy a pair of them (6RMB) and went on an excursion in the cold night to acquire a bunch of precision screwdrivers (25RMB, although really they’re worth 15). Pretty difficult achievement since this is after 9pm on a Friday night!
While charging the battery, I used my new screwdrivers and removed the plastic cover. I also took a look at the electronics for the transmitter. The transmitter is very simple, with 4 contact switches, what I assume is a Pulse Modulation IC, a couple of capacitors and resistances. The way an RC transmitter works is described informatively on “How Stuff Works“.
As an hack, I hook up the four switches to each emitter pin of a ULN2803APG (a simple IC that is basically 8 NPN transistors) with the base controlled by the Arduino itself. This lets me control the car with a very simple program to test Forward, Backward, Left and Right.
The challenges ahead:
1) finding a distance ranging solutions
The robot needs to know how far walls and various objects are…
a) either IR (Sharp IR)
The GP2Y0A700 looks like one with the longest range, but it’s also very expensive (around 50$USD). The next one, GP2Y0A02, is about 15$USD with a range of 20cm-150cm. I probably want a bunch (3?) so I this is probably more cost effective.
b) or ultrasonic (such as the Parallax Ping or SeeedStudio Ultrasonic Range Measurement module)
c) probably a combination of them
2) need to mount the Arduino, a breadboard and the sensors on the car. This will probably require a custom aluminium plate that I can mount using the screwholes that were used for the plastic cover.
3) Figuring out how to control the motors.
Two ways;
a) remove the current control board and substitute my own. This means an H-bridge that would let me control the motors both ways (Texas Instruments L293NE or Texas Instruments SN754410)
b) create my own RC transmitter.
I’m favoring (b) right now and I went out to buy a bunch of 27.145Mhz crystals at electronics town (10RMB for 8!)
]]>