November 7th, 2013 § § permalink
#outlook a{
padding:0;
}
body{
width:100% !important;
}
.ReadMsgBody{
width:100%;
}
.ExternalClass{
width:100%;
}
body{
-webkit-text-size-adjust:none;
}
body{
margin:0;
padding:0;
}
img{
border:0;
height:auto;
line-height:100%;
outline:none;
text-decoration:none;
}
table td{
border-collapse:collapse;
}
#bodyTable{
height:100% !important;
margin:0;
padding:0;
width:100% !important;
}
body,#bodyTable,.productImageBlock{
background-color:#DEE0E2;
}
.borderBar{
background-image:url(‘http://gallery.mailchimp.com/27aac8a65e64c994c4416d6b8/images/diagborder.png’);
background-position:top left;
background-repeat:repeat;
height:5px !important;
}
h1{
color:#3F3A38;
display:block;
font-family:Georgia;
font-size:40px;
font-weight:normal;
line-height:100%;
letter-spacing:normal;
margin-top:0;
margin-right:0;
margin-bottom:10px;
margin-left:0;
text-align:left;
}
h2{
color:#3F3A38;
display:block;
font-family:Georgia;
font-size:24px;
font-weight:normal;
line-height:100%;
letter-spacing:normal;
margin-top:0;
margin-right:0;
margin-bottom:10px;
margin-left:0;
text-align:left;
}
h3{
color:#ED5E29;
display:block;
font-family:Georgia;
font-size:16px;
font-weight:normal;
line-height:100%;
letter-spacing:normal;
margin-top:0;
margin-right:0;
margin-bottom:10px;
margin-left:0;
text-align:left;
}
h4{
color:#3F3A38;
display:block;
font-family:Georgia;
font-size:12px;
font-weight:normal;
line-height:100%;
letter-spacing:normal;
margin-top:0;
margin-right:0;
margin-bottom:10px;
margin-left:0;
text-align:left;
}
.preheaderContent{
color:#505050;
font-family:Helvetica;
font-size:11px;
line-height:125%;
text-align:left;
}
.preheaderContent a:link,.preheaderContent a:visited,.preheaderContent a .yshortcuts {
color:#505050;
font-weight:normal;
text-decoration:underline;
}
#templateHeader{
background-color:#F8F8F8;
border-top:10px solid #A6BFC9;
}
.headerContent{
color:#505050;
font-family:Helvetica;
font-size:18px;
font-weight:bold;
line-height:100%;
padding-top:20px;
padding-right:40px;
padding-bottom:20px;
padding-left:40px;
text-align:left;
vertical-align:middle;
}
.headerContent a:link,.headerContent a:visited,.headerContent a .yshortcuts {
color:#505050;
font-weight:normal;
text-decoration:underline;
}
#headerImage{
height:auto;
max-width:600px !important;
}
#templateBody{
background-color:#F8F8F8;
}
.upperBodyContent{
color:#43404D;
font-family:Georgia;
font-size:16px;
line-height:150%;
text-align:left;
}
.upperBodyContent a:link,.upperBodyContent a:visited,.upperBodyContent a .yshortcuts {
color:#ED5E29;
font-weight:normal;
text-decoration:none;
}
.upperTemplateButton{
-moz-border-radius:5px;
-webkit-border-radius:5px;
background-color:#ED5E29;
border-radius:5px;
}
.upperTemplateButtonContent,.upperTemplateButtonContent a:link,.upperTemplateButtonContent a:visited,.upperTemplateButtonContent a .yshortcuts {
color:#FFFFFF;
font-family:Georgia;
font-size:31px;
font-weight:normal;
text-align:center;
text-decoration:none;
}
.lowerBodyContent{
color:#43404D;
font-family:Georgia;
font-size:14px;
line-height:125%;
text-align:left;
}
.lowerBodyContent a:link,.lowerBodyContent a:visited,.lowerBodyContent a .yshortcuts {
color:#ED5E29;
font-weight:normal;
text-decoration:none;
}
.lowerTemplateButton{
-moz-border-radius:5px;
-webkit-border-radius:5px;
background-color:#ED5E29;
border-radius:5px;
}
.lowerTemplateButtonContent,.lowerTemplateButtonContent a:link,.lowerTemplateButtonContent a:visited,.lowerTemplateButtonContent a .yshortcuts {
color:#FFFFFF;
font-family:Georgia;
font-size:19px;
font-weight:normal;
text-align:center;
text-decoration:none;
}
.bodyContent img{
display:inline;
height:auto;
}
#templateFooter{
background-color:#F8F8F8;
border-bottom:10px solid #A6BFC9;
}
.footerContent{
color:#3F3A38;
font-family:Georgia;
font-size:12px;
line-height:150%;
text-align:center;
}
.footerContent a:link,.footerContent a:visited,.footerContent a .yshortcuts {
color:#EB4102;
font-weight:normal;
text-decoration:underline;
}
.footerContent img{
display:inline;
}
#monkeyRewards img{
max-width:190px;
}
|
|
|
|
|
|
MSP/Jitter Workshop (Nov 9-10)
Max is the environment you use to create visual programs, called patches, plus a set of building blocks (called objects) used in those programs. MSP is a set of Max objects for audio and signal processing. Jitter is a set of Max objects for video, graphics, and matrix data processing.
MAX是您使用的环境,创造视听节目,被称为修补程序,加上这些程序中使用了一套积木(称为对象)。 MSP是一组音频信号处理的最大对象。Jitter是最大的一组视频,图形和矩阵数据处理的对象。 |
|
Two days workshop for
¥600
|
|
|
|
|
|

|
InsectBot
(Nov 16 2pm)
虫虫机器人
(11月16号 2pm)
Come build your world-destroying INSECTBOT.
Audience: any person aged from 5 ~ 99 interested in robotics 😉
Bring your own notebook
The Insectbot kit includes the following:
- Arduino board
- 2 Servo
- 1 Ultrasound distance sensor
- Other materials for the robot structures
参加人员:5岁到99岁对机器人有兴趣的小朋友!;-)
需要自己准备笔记本
包含下列材料:
- Arduino微控制器板
- 舵机2个
- 超音波距离传感器1个
- 其他机器人结构材料
|
|
|
|
|
|
|
|
|
|
Get Started with Arduino
(Nov 17)
Arduino入门工作坊
(11月17号)
Content of the workshop:
* Introduction to Arduino: board, IDE
* Build a few interesting circuit with a breadboard and Protoboard (soldering)
* Followed by a discussion and Q&A
内容:
* 入门Arduino(IDE /编程/挂接传感器)
* 动手做几个简单的电路与编程、实验板焊接
* 讨论与问答
|
|
|
|
|
|
|
]]>
August 2nd, 2012 § § permalink
http://wiki.xinchejian.com/wiki/Swarm_robots]]>
June 18th, 2011 § § permalink
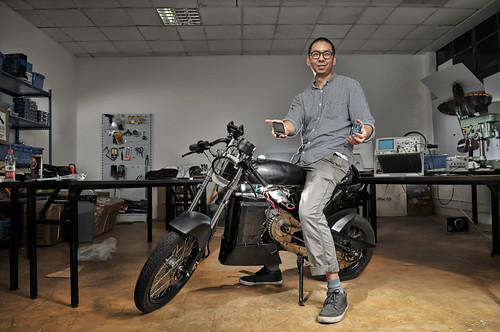
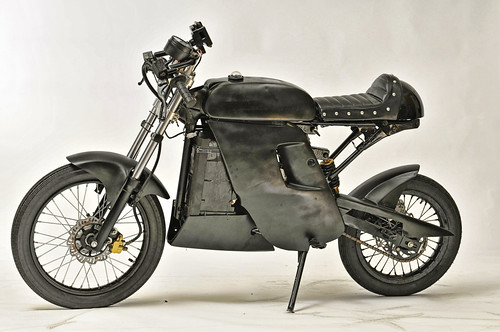
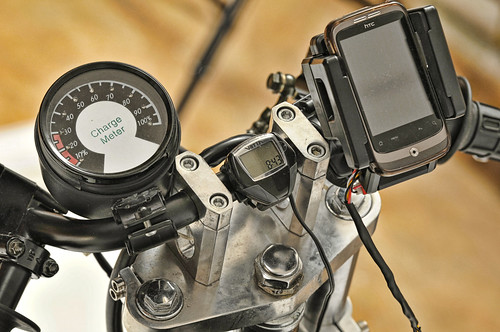
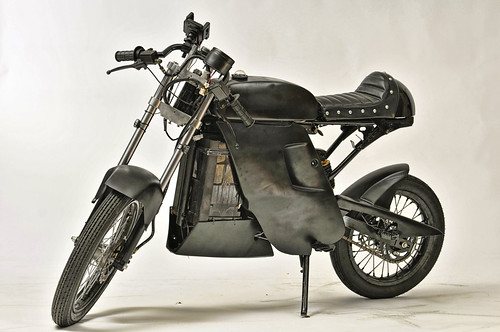
We are really happy to have the opportunities in hosting the Rudy Bike in the past few weeks so they can finish the bike for the Demo Day. Rudy Bike is a cool looking electric bike controlled by Arduino and Android.
]]>
June 8th, 2011 § § permalink
Android Open Accessory Development Kit.
The Android 3.1 platform (also backported to Android 2.3.4) introduces Android Open Accessory support, which allows external USB hardware (an Android USB accessory) to interact with an Android-powered device in a special “accessory” mode. When an Android-powered powered device is in accessory mode, the connected accessory acts as the USB host (powers the bus and enumerates devices) and the Android-powered device acts as the USB device. Android USB accessories are specifically designed to attach to Android-powered devices and adhere to a simple protocol (Android accessory protocol) that allows them to detect Android-powered devices that support accessory mode.
Workshops are weekly and will explore both the development on the Android-side and the micro-controllers side – touching on all aspects of mechanical, electrical and software engineering of a robot.
In particular, we will look together at the use of ADK-compatible hardware boards, such as the
Google IOIO board or new hardware offerings from
Seeedstudio.
Participation for XinCheJian members who’ve paid their dues is free. For the non-members, the fee is 50 RMB per workshop.
For more information, look at the
“Android & Robots” wiki.
Don’t forget to fulfill the necessary pre-requisites and join the [email protected] mailing list! Note that this is a collaborative workshop, so we expect everyone to contribute and participate actively.


]]>
May 9th, 2011 § § permalink
We got full house this Sunday with 13 people doing Insect Bot workshop including 10 kids. It’s a lot of fun and most of insect got to walk.

]]>
May 7th, 2011 § § permalink
Thanks to Miclle Zhang bringing his electronic Wave board to XinCheJian today. He hacked it out of components found on Taobao combining a Wave Board and motor from electric bike. AWESOME Hack and we had a lot of fun playing with it this afternoon. Miclle is kind enough to leave it at the space to let anyone interested to check it out.

Some video
More pictures


]]>
May 6th, 2011 § § permalink
遥控小车的改造
May 3rd, 2011
今天完成了遥控车的改造,这是自主控制的第一步。这辆车是在淘宝上买的,结构很简单,控制很简陋。方向就是将电机打死,这时候电流会非常大,而且对于将来的自主移动的精细控制带来不利因素。所以很早就想把它改成舵机控制的了,下面就是整个改造的过程。
这就是需要改造的部分。

先将需要改造的部分画下来,便于设计框架结构。我不是机械出身的,所以就画个大概吧。

结构图完成

在图纸上设计新的结构

根据设计切割材料

最后完成的样子,由于是临时电路,也就没固定,看上去有点像垃圾车-_-b

改造部分的特写

再来一张

这些只是机械部份,然后就是控制部份。由于舵机能够转动的角度范围到180度,而该车的转向轮仅能转动在30-40度之间。同时,自主移动机器人目标是在Arduino上面开发。所以我就一步到位,先用Arduino读取天地飞的pwm信号,然后经过转换,输出新的pwm信号给舵机,这样就不会因为卡住而损坏舵机了。
最后效果如下
http://v.youku.com/v_show/id_XMjYzOTc2NzA4.html
使用的程序非常简单,如下:
#include <Servo.h>
//Author:	HE Qichen
//Date:	2011-5-3
//Website:	http://gaishi.vicp.net
//Email:	heqichen(a)gaishi.vicp.net
Servo directionServo;
void setup()
{
  pinMode(2, INPUT);
  directionServo.attach(3);
}
void loop()
{
  int t, a;
  t = pulseIn(2, HIGH);
  a = map(t, 1000, 2000, 65, 115);
  directionServo.write(a);
}
]]>
May 6th, 2011 § § permalink
Arduino读取g-sensor数据
May 2nd, 2011
在四轴飞行器上除了要有陀螺仪外,还要有个重要的传感器就是重力传感器。由于它们各自的误差,若使用单一的传感器会造成严重的精读问题,使飞行器丧失稳定性。所以要用两个传感器进行相互矫正。
现在重力传感器应用非常广,目前iphone等智能手机上都有重力传感器,包括笔者的一台山寨手机上都有重力传感器。
这次就是要用Android来读取重力传感器的数据。这个重力传感器模块是从淘宝购买的,模块非常简单,自己够买芯片来焊接也不成问题。根据它的datasheet,就能够知道如何使用这款重力加速度模块了。下面就进行详细的介绍
这个模块使用的芯片型号是MMA7260Q,(datasheet下载[PDF,229KB]),测试中的电路就是下面图片中的样子

控制的目标是通过重力传感器的数据来控制舵机的转动。但是发现会有少量的抖动,于是在程序中加入了一个简单的滤波器,阶数没有仔细调,但是基本上能够进行控制了。
http://v.youku.com/v_show/id_XMjYzNjIyODIw.html
下面是芯片的特写


下面是用到的代码
#include <Servo.h>
//Author:  HE Qichen
//Email:  heqichen(a)gaishi.vicp.net
//Website:  http://gaishi.vicp.net
//Date:  2011-5-2
#define FILTER_LEVEL  3
class Filter
{
  private:
    int buffer[FILTER_LEVEL];
  public:
    Filter()
    {
      int i;
      for (i=0; i<FILTER_LEVEL; ++i)
      {
        buffer[i] = 0;
      }
    }
    int filter(int value)
    {
      int i;
      int sum;
      for (i=0; i<FILTER_LEVEL-1; ++i)
      {
        buffer[i] = buffer[i+1];
      }
      buffer[FILTER_LEVEL-1] = value;
      sum = 0;
      for (i=0; i<FILTER_LEVEL; ++i)
      {
        sum += buffer[i];
      }
      return sum / FILTER_LEVEL;
    }
};
Servo testServo;
Filter xFilter, yFilter, zFilter;
void setup()
{
  Serial.begin(9600);
  testServo.attach(2);
}
void loop()
{
  int gx, gy, gz;
  gx = analogRead(A0);
  gy = analogRead(A1);
  gz = analogRead(A2);
  Serial.print("x: ");
  Serial.print(gx, DEC);
  Serial.print("  y: ");
  Serial.print(gy, DEC);
  Serial.print("  z: ");
  Serial.println(gz, DEC);
  int fgx, fgy, fgz;
  fgx = xFilter.filter(gx);
  fgy = yFilter.filter(gy);
  fgz = zFilter.filter(gz);
  Serial.print("  fx: ");
  Serial.print(fgx, DEC);
  Serial.print("  fy: ");
  Serial.print(fgy, DEC);
  Serial.print("  fz: ");
  Serial.println(fgz, DEC);
  testServo.write((fgz-100)/3);
  //delay(10);
}
]]>
May 6th, 2011 § § permalink
嵌入之梦-圆梦小车开发
May 1st, 2011
今天看到一台嵌入之梦的小车,但是上电之后发了疯似的乱跑,所以刷之。但新车间却没有网络,没办法,自己一点一点试。。结果如下
CT1	接受pwm,控制速度
CT2	前进控制信号,高电位转动
CT3	后退控制信号,高电位转动
但是由于小车上的UNO与我的Ubuntu连接有问题,貌似只有Windows是好的,Mac OS有时也会出问题。所以最后车上改用了Mega 1280。
但是又发现一个问题,就是Arduino使用USB供电的时候很正常,然而,使用车上接出来的5V电源时,程序就会混乱,完全没有一点规律。猜测可能是由于电机转动导致整个系统的电压下降,无法提供足够的电压给Arduino的板子上。这大概也是之前uno不会发疯的原因。没办法,在小车上再接一块9V层叠式电池,作为Arduino的电源。最后终于行了。
后面程序的作用是往前走,遇到前方有物体是后退,打弯,然后继续往前,一个简单的壁障程序。没有用到速度控制。下面就是这个小车最后的样子,手机拍的,将就看吧

左侧照

右侧照

再来一张
 http://v.youku.com/v_show/id_XMjYzMzY0NzA0.html
用到的程序就是下面的
//Author:	HE Qichen
//Email:	heqichen(a)gaishi.vicp.net
//Website:	http://gaishi.vicp.net
//Date:	2011-5-1
int status;
#define LEFT_SPEED   6
#define LEFT_FORWARD  7
#define LEFT_BACKWARD  8
#define RIGHT_SPEED  10
#define RIGHT_FORWARD  11
#define RIGHT_BACKWARD  12
#define ULTRASONIC_ECHO  3
#define ULTRASONIC_TRIG  4
#define NORMAL_SPEED  100
#define STOP_SPEED  0
void setup()
{
  Serial.begin(9600);
  setupMove();
  setupUltrasonic();
}
void loop()
{
  unsigned int d;
  moveForward();
  d = readDistance();
  Serial.println(d, DEC);
  if (d < 700)
  {
    moveBackward();
    delay(500);
    turnLeft();
    delay(200);
  }
}
void moveForward()
{
  analogWrite(LEFT_SPEED, NORMAL_SPEED);
  digitalWrite(LEFT_BACKWARD, LOW);
  digitalWrite(LEFT_FORWARD, HIGH);
  analogWrite(RIGHT_SPEED, NORMAL_SPEED);
  digitalWrite(RIGHT_BACKWARD, LOW);
  digitalWrite(RIGHT_FORWARD, HIGH);
}
void moveBackward()
{
  analogWrite(LEFT_SPEED, NORMAL_SPEED);
  digitalWrite(LEFT_BACKWARD, HIGH);
  digitalWrite(LEFT_FORWARD, LOW);
  analogWrite(RIGHT_SPEED, NORMAL_SPEED);
  digitalWrite(RIGHT_BACKWARD, HIGH);
  digitalWrite(RIGHT_FORWARD, LOW);
}
void turnLeft()
{
  analogWrite(LEFT_SPEED, NORMAL_SPEED);
  digitalWrite(LEFT_BACKWARD, HIGH);
  digitalWrite(LEFT_FORWARD, LOW);
  analogWrite(RIGHT_SPEED, NORMAL_SPEED);
  digitalWrite(RIGHT_BACKWARD, LOW);
  digitalWrite(RIGHT_FORWARD, HIGH);
}
void turnRight()
{
  analogWrite(LEFT_SPEED, NORMAL_SPEED);
  digitalWrite(LEFT_BACKWARD, LOW);
  digitalWrite(LEFT_FORWARD, HIGH);
  analogWrite(RIGHT_SPEED, NORMAL_SPEED);
  digitalWrite(RIGHT_BACKWARD, HIGH);
  digitalWrite(RIGHT_FORWARD, LOW);
}
void moveStop()
{
  analogWrite(LEFT_SPEED, STOP_SPEED);
  digitalWrite(LEFT_BACKWARD, LOW);
  digitalWrite(LEFT_FORWARD, LOW);
  analogWrite(RIGHT_SPEED, STOP_SPEED);
  digitalWrite(RIGHT_BACKWARD, LOW);
  digitalWrite(RIGHT_FORWARD, LOW);
}
void setupMove()
{
  pinMode(LEFT_SPEED, OUTPUT);
  pinMode(LEFT_FORWARD, OUTPUT);
  pinMode(LEFT_BACKWARD, OUTPUT);
  pinMode(RIGHT_SPEED, OUTPUT);
  pinMode(RIGHT_FORWARD, OUTPUT);
  pinMode(RIGHT_BACKWARD, OUTPUT);
  analogWrite(LEFT_SPEED, STOP_SPEED);
  digitalWrite(LEFT_FORWARD, LOW);
  digitalWrite(LEFT_BACKWARD, LOW);
  analogWrite(RIGHT_SPEED, STOP_SPEED);
  digitalWrite(RIGHT_FORWARD, LOW);
  digitalWrite(RIGHT_BACKWARD, LOW);
}
unsigned int readDistance()
{
  int duration;
  digitalWrite(ULTRASONIC_TRIG, LOW);
  delayMicroseconds(2);
  digitalWrite(ULTRASONIC_TRIG, HIGH);
  delayMicroseconds(5);
  digitalWrite(ULTRASONIC_TRIG, LOW);
  // The same pin is used to read the signal from the PING))): a HIGH
  // pulse whose duration is the time (in microseconds) from the sending
  // of the ping to the reception of its echo off of an object.
  duration = pulseIn(ULTRASONIC_ECHO, HIGH);
  return duration;
}
void  setupUltrasonic()
{
  pinMode(ULTRASONIC_TRIG, OUTPUT);
  pinMode(ULTRASONIC_ECHO, INPUT);
  digitalWrite(ULTRASONIC_TRIG, LOW);
}
]]>
May 6th, 2011 § § permalink
自主机器人项目
我想通过改造一辆遥控小车,造出个自主移动机器人,遥控车就是下面这张图片中的车。

并且希望通过大家的智慧,把这个机器人做好,比如说,想在上面放一个无线摄像头;比如说,在上面放一个机械手臂;比如说,在这上面装一个超声测距模块……我将集中大家的智慧,集合到这个小车上面,^_^
http://v.youku.com/v_show/id_XMjYyMzQ4OTYw.html
如果你有想法,请告诉我 hacker(a)gaishi.vicp.net
]]>


