March 21st, 2011 § § permalink
上海的RoboPeak
非常高兴上海 RoboPeak 机器人研发团队会在 3/26的活动 上为我们带来演说。非常期待。
从他们的网站上:
RoboPeak是国内由一群软件工程师、电子工程师、新媒体艺术家所组成的机器人及相关技术领域的设计研发团队,团队于2009年底创建。
团队致力于民用机器人平台系统、机器人操作系统(ROS)以及相关设备的设计研发,并尝试将日新月异的机器人技术融入人们的日常生活与娱乐当中。同时,我们将尽力为机器人技术在开源硬件、开源软件社区的普及做出贡献。
团队在嵌入式系统、系统级软件/固件、图像识别等领域拥有丰富的经验,拥有独立设计,开发机器人操作系统、相关传感器设备硬件/固件的能力。
这个团队在机器人和Arduino上做了相当多开发,详细的情况可以查看他们的博客.底下的图片来自他们的博客,看起来相当有趣的机器人设计,期待周六和他们见面。
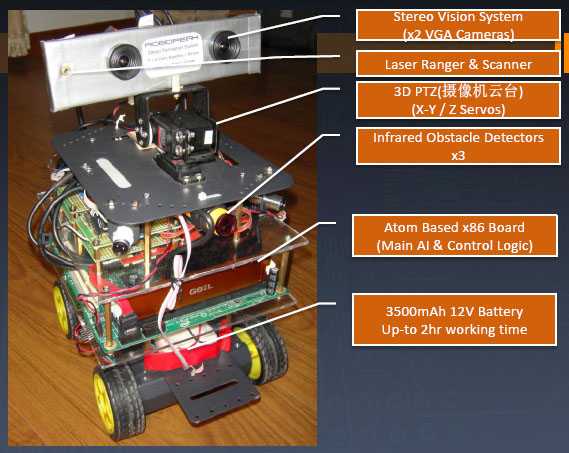
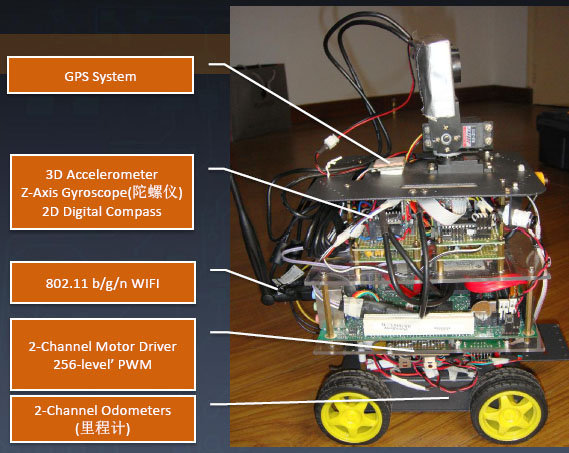
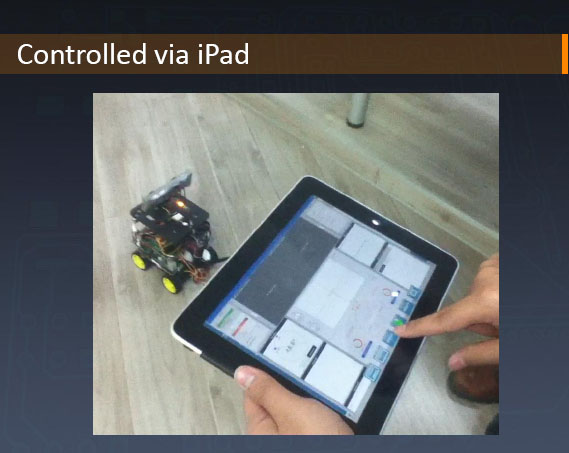
iPad 遥控
]]>
March 13th, 2011 § § permalink
XinCheJian was in Barcamp Shanghai!
We took the Green for the afternoon to talk about Hackerspace, Maker, Open Source Hardware and of course ROBOTS!!! 😉

The crazy robot car David was carrying around at Barcamp
The robot was built the night before barcamp with YM4 from Embedream, Arduino Uno and a HC-SR04. The little YM4 is a lot of fun. The independently controlled wheels allowing the car to turn on a fix axis and this saves the use to savor to turn the limited angle SR04 around to inspect the environment. But at 3AM, it was discovered a little drawback of controlling two independent wheels while trying to make the it going straight. Well, it was 3AM so I decide to let it acts a little crazy. I am dedicating this crazy robot to the crazy Shanghai taxi driver who took me to the barcamp in the morning! I will name it 840. 😉

Pitching Hackerspace
Kicking off the afternoon with pitch of Hackerspace and Maker Culture

Hmm, this is why the call this session “THE GREEN.” Get to make fun of making is much more fun then golf as hobby.

HCR, the open source robots from DFRobot
Rick Ye gave a talk on his open source HCR robot. I was driving it around to round up people to the talk. This version has a cam pointing upward and a automated navigation mode. It’s a lot of fun to watch it walking all over the place on its own from the video at the control.

This little guy has great potential to be a good caddy on the green.

Video of HCR
Thanks to Scott for the video.
]]>
March 5th, 2011 § § permalink
#ym4-arduino-uno img
{
margin:5px;
padding:5px;
display:block;
}
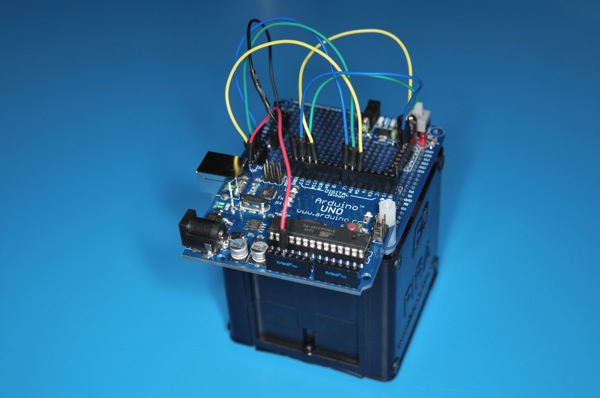
Another weekend night of hacking fun hooking up a Arduino Uno with YM4 robotic car from EmbeDream. The YM4 is a well designed FIRA compliant robot car with built in power supply. The left and right wheels are controlled independently and the built in feedback from wheels.
The break out board for the YM4 is easy to work with. The H-bridge control are CT1, CT2, and CT3. CT1 control the speed with PWM and CT2/CT3 decide the direction of the wheel. This is the same configuration for both wheels. The following is a quick sketch to get YM4 going forward.
#define RIGHT_CTRL_1 5
#define RIGHT_CTRL_2 6
#define RIGHT_CTRL_3 7
#define LEFT_CTRL_1 11
#define LEFT_CTRL_2 12
#define LEFT_CTRL_3 13
void setup()
{
 pinMode(RIGHT_CTRL_2, OUTPUT);
 pinMode(RIGHT_CTRL_3, OUTPUT);
 pinMode(LEFT_CTRL_2, OUTPUT);
 pinMode(LEFT_CTRL_3, OUTPUT);
}
void loop()
{
  digitalWrite(RIGHT_CTRL_2, 0);
  digitalWrite(RIGHT_CTRL_3, 1);
  analogWrite(RIGHT_CTRL_1, 128);
  digitalWrite(LEFT_CTRL_2, 0);
  digitalWrite(LEFT_CTRL_3, 1);
  analogWrite(LEFT_CTRL_1, 128);
}
Now, the TODO list
- Find a more secure way to protect the Uno board and protect it from bumping into objects when robot start to run
- Figure out how and where to attach sensors: ultrasonic distance and infra red for distance and obstacle sensing
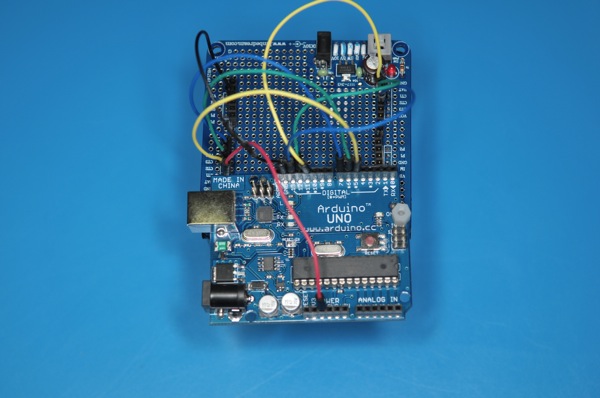
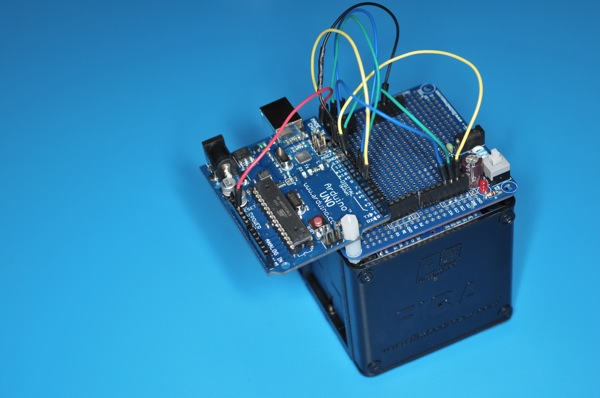
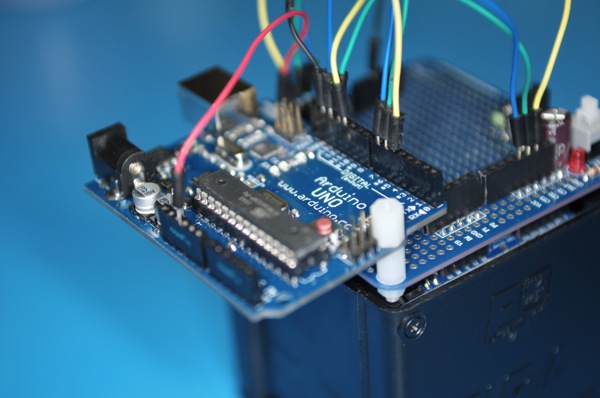
]]>
February 28th, 2011 § § permalink
@theliuyan just posted a few pictures from the Sunday’s Cub Scout event. It was fun to introduce some hardware hacking to cub scouts. I think they enjoyed it with their great group of supportive parents. Just put Tiger Mom on the title for SEO. 😉 The activity is part of their scout engineering and we were making Electronics Dice.


]]>
February 27th, 2011 § § permalink
Got a chance to introduce Arduino to the boy scout at YCIS. It was a fun afternoon working with the boys and the parents. Here are more on the design of the electronic dice. Look forward to seeing the boys completing the system next week.
The tool used to design the dice is Fritzing. It’s an open source design program for interactive electronics. The functionalities of the dice is pretty straight forward: when the button is press, the LEDs start to flash and on the release of the button, one of the LED is randomly picked.

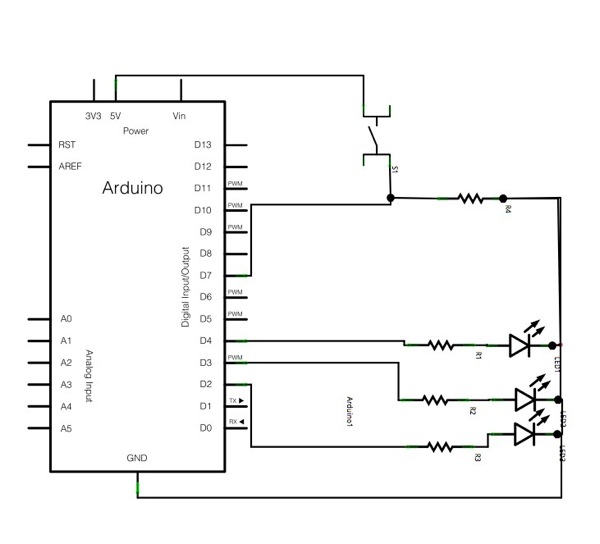
Arduino is used to drive the dice logics. Arduino is a popular open source microcontroller for building interactive electronics. It comes with an easy-to-use IDE that can be downloaded here.
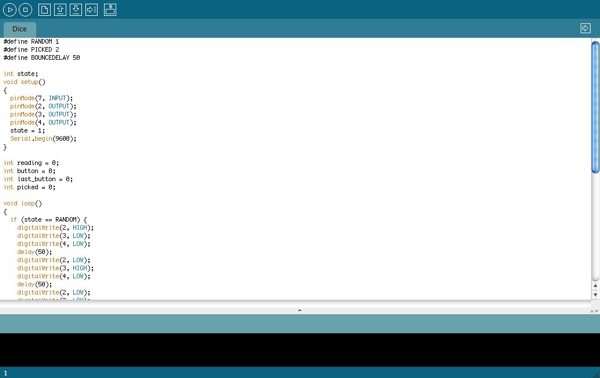
The complete program of the dice is here. Just connect up the Arduino board to the computer using the USB cable and launch the IDE to upload the program. Would be fun to see some tinkering with the program to provide different behavior of the dice.
#define RANDOM 1
#define PICKED 2
#define BOUNCEDELAY 50
int state;
void setup()
{
  pinMode(7, INPUT);
  pinMode(2, OUTPUT);
  pinMode(3, OUTPUT);
  pinMode(4, OUTPUT);
  state = 1;
  Serial.begin(9600);
}
int reading = 0;
int button = 0;
int last_button = 0;
int picked = 0;
void loop()
{
  if (state == RANDOM) {
    digitalWrite(2, HIGH);
    digitalWrite(3, LOW);
    digitalWrite(4, LOW);
    delay(50);
    digitalWrite(2, LOW);
    digitalWrite(3, HIGH);
    digitalWrite(4, LOW);
    delay(50);
    digitalWrite(2, LOW);
    digitalWrite(3, LOW);
    digitalWrite(4, HIGH);
    delay(50);
  } else if (state == PICKED) {
    digitalWrite(2, LOW);
    digitalWrite(3, LOW);
    digitalWrite(4, LOW);
    digitalWrite(picked, HIGH);
  }
  reading = digitalRead(7);
  if (reading == last_button) {
    button = reading;
  } else {
   last_button = reading;
  }
  if (button == 1) {
    state = RANDOM;
  } else {
    state = PICKED;
    if (button != last_button) {
      picked = random(3) + 2;
    }
  }
}
]]>
February 7th, 2011 § § permalink
I have been playing around with OpenBlocks. It’s a very flexible environment to create a new block language. When it comes to design one for Arduino, I found myself wondering between two different styles of design.
Design I
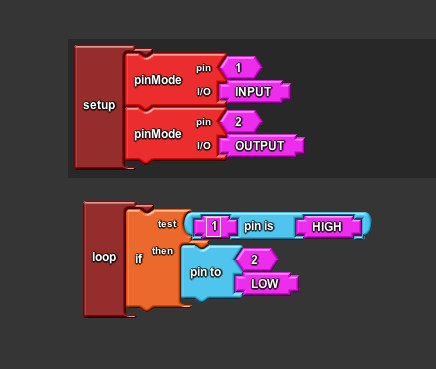
The first design is of course to follow the Arduino Language Reference closely. However, the resulting block language seems to be a bit too “verbose?” Or should I say “busy” since it’s really a graphical representation of the textual program. Here is a sample of what it looks like for the equivalence of codes here.
void setup() {
  pinMode(1, INPUT);
  pinMode(2, OUTPUT);
}
void loop() {
  if (digitalRead(1) == HIGH) {
    digitalWrite(2, LOW);
  }
}
Design II
Since the block language is targeted at the beginner of Arduino and programming, most of time, we talk about “When the button on pin 1 is pushed, I want the LED on pin 2 to light up.” There is a much natural way to map this statement into an intuitive block language by building the blocks around the pin. Here is how it may look like:
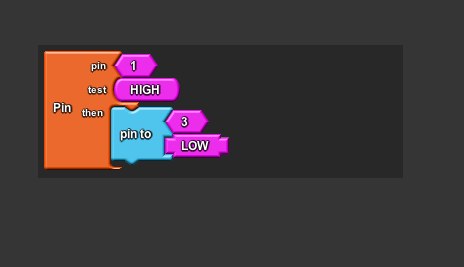
This language is more concise and easier to understand. The language itself should provide enough meta info to infer the setup codes. However, in order to do this, the language may need a little runtime (OS?) to be compiled along with the Sketch but it seems to be worth the effort.
The OpenBlocks codes I am playing around with the idea is available at my ‘ant’ branch openblocks on github. Appreciate any feedback on this.
]]>
February 5th, 2011 § § permalink
To make Arduino easier for non-programmers, I decided to start a visual programming environment similar to Scratch for Arduino.
Similar Projects around the Web
Modkit is a similar project but at the time I wanted to start the project, it was in a closed alpha. Also, it seems that modkit is going to be proprietary and I want an open source VPL for Arduino. By the way, Modkit CrimpCards is an awesome idea and design.
S4A (Scratch for Arduino) is another interesting project but it’s for using Scratch with Arduino instead of programming for Arduino.
David Mellis over at MIT Media Lab also has a project called “Scratch for Arduino” but no detail yet. David is also one of the creator of Arduino platform.
Arduino IDE and OpenBlocks
Fork the source of Arduino IDE hosted on github to host my version here. Next stop is to find a library for the visual programming. I found a project called OpenBlocks developed as part of the MIT StarLogo NG. Open Blocks is also used in Google’s Android development tool App Inventor.
Both Arduino IDE and Open Blocks are written in Java so the integration should be smooth. Since I have done by share of Java, I decided to also use this opportunities to look into a few alternative languages running on JVM to implement this. Since I have done mostly Ruby for the past few years, JRuby looks pretty good. The language I really want to use is Clojure but it seems it’s a bit tricky to use it embedded in a Java app. Will give both a try and see how it goes.
Let the hacking beging!
Hopefully, we will have a running version in the next few weeks.
]]>
January 26th, 2011 § § permalink
Flamingo EDA brought to the Xinshanzhai talk is the Lego compatible sensor block! This is very awesome. I WANT ONE! Actually, I want a DOZENS and a bucket of Lego blocks!
 ]]>
]]>
January 17th, 2011 § § permalink
January 17th, 2011 § § permalink
新车间的机器人课程是针对对物理运算有兴趣了解的朋友提供入门的课程和实践机会,适合十岁以上的人参加。
课程内容为:
8小时的授课时间:
- Arduino入门
- 电子和物理计算硬件概念
- 编程语言处理
- 物理计算: 软件與硬件的互动
- 机器人入门
- 什么是机器人?
- 如何用遥控车和Arduino來做机器人
- 自主玩具机器人 (A.R.T.) 入门
16小时的实验室时间:
对于15岁以下的孩子,我们希望看到家长一同参加。
课程总费用为1500元,包括8小时授课时间和16小时的实验室时间,Arduino材料费,玩具遥控车一台和基本传感器(价值500元),并赠送两个月的新车间超级会员(价值4000元)。
课程時間為周日下午,有兴趣参加可以写邮件到
[email protected] 报名。
Robot class@Xinchejian aims to promote the understanding of physical computing and provide hands-on experience with Arduino platform. This class is designed for 10 years old and more. The robot class consists of 8 hours of lectures and 16 hours of practice.
8 hours of lecture:
- Introduction to Arduino
- Hardware Concept of Electronics and Physical Computing
- Processing programming language
- Physical Computing: Interface Digital and Physical world
- Introduction to Robotics
- What’s robot?
- Robotics using RC car and Arduino
- Introduction to A.R.T.
16 hours of supervised hands-on labs:
- 2 ~ 3 teachers in labs offering assistance
- make your own autonomous robot car
For kids under 15, we’d like to see parent participate.
The cost of the courses is 1500RMB, including 8 hours of lecture plus 16 hours hands-on lab, the Arduino starter kit, RC car and basic sensor (500RMB in value). We will also provide you two-month Xinchejian super membership (4000RMB in value) for free.
The classes will be on Sunday afternoon. For class registration, please send email to
[email protected].]]>


 ]]>
]]> 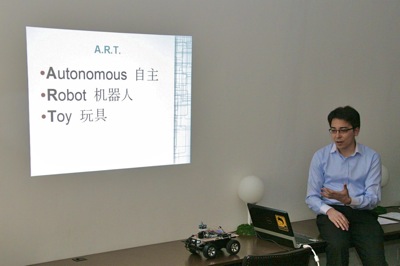 Then we have the introduction to the HCR robots by the presenter also named Ricky. HCR is an open source robot built to for home caring.
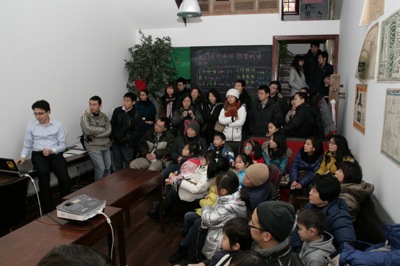
 And some random photos from the events.
 ]]>
]]>